Informer Sample Reports
AD Internet Orders Base Revenue Report
This is a great starter for Revenue reports based on the AD Internet Orders mapping.
This is a "starter" dataset that is great for most revenue reports.
It includes
- Net/Gross Revenue - Both local and foreign amounts
- Rep/Gross Revenue - Both local and foreign amounts
- GL Codes - Based on the overrides in your product setup
- Other needed fields
To calculate the Revenue Amounts it uses the calculateLineAmounts saved function.
To calculate the Rep Revenue Amounts it uses the calculateRepAmounts saved function.
The GL codes uses the logic detailed in the documentation -> GL Code Logic
Adding Fields to the Starter Dataset
You can add fields to augment the data in the dataset, but you do need to be aware of certain steps if you add certain Multivalued fields.
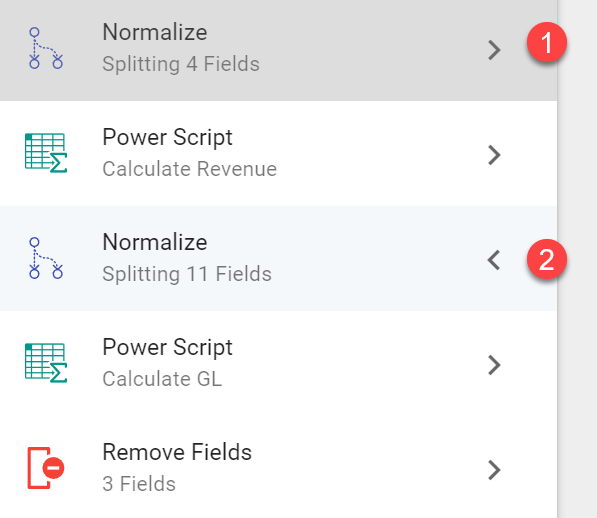
- Month prefixed fields - If you add any field from AD Internet Orders with the prefix of Month, like MONTH.START.DATE, you will need to make sure that you also add that field to the FIRST normalize flow step.
- Line Detail Level Amount Fields - Since this started dataset is calculating Rep Revenue amounts, we need to take special steps to make sure to not overstate Line Detail Revenue. For example, if you had two reps on an order, each getting 50%, then that line would become two separate lines. The second Flow step includes ANY Revenue field that we do not want duplicated across multiple reps. So, if you add a value field that you are going to aggregate, make sure to add it to the second Flow step.
Simple AR Aging Summary
The simple AR Aging summary report will summarize invoices on a per client basis and drop into pre-defined buckets.
The report has two dependencies which will be created when importing the main report below.
[JOIN]-Cash on Account For Aging - This dataset aggregates Cash On Account per Client Id. Base mapping is AR Cash
[JOIN]-Default Brand Rep - This dataset returns the default brand reps defined for each customer.
AR Invoices Performance Applied
NOTE: This is a custom report that may be bugging. Test and refine to make sure it works for you.
Download Report Sample
AR Invoices Performance Applied Ad Hoc Report - [NAVIGA]-AR Invoices Performance - Applied
Be aware that in the second Report (By Rep), that I have modified the sort from Campaign Id, Line Id, Month Start Date to JUST Campaign Id and Line ID.
This had to be done because of how the sorting "explodes" the MV fields to get the Month Start Date sorted.
This should not be a problem unless you have Lines where the Month start dates are not ascending.
This report attempts to show applied amounts for each line's associated invoices and checks how much of the invoice is has been paid. It then takes this "Applied Amount" and distributes it across the Lines that the invoice is assigned to.
Many times it is one invoice per line, but if there are multiple Line Details (Month Start Dates), this would distribute the applied amount across those dates.
In cases where the invoice is applied to multiple Line Ids, the code attempts to do the same thing.
Here is the final Power Script that handles the above:
//var netRevenue = $record.netLineLocalAmount
// Use the rep Net amount for our calculation
var netRevenue = $record['netRepAmount']

// IF amountAppliedLeft is NOT defined for invoice Initialize it
if (!$local.amountAppliedLeft[$record['monthInvoiceId']]) {
    $local.amountAppliedLeft[$record['monthInvoiceId']] = $record['month_invoice_id_assoc_invAmount'] - $record['month_invoice_id_assoc_invBalance']
}

// If the amountApplied Left is greater than this lines amount, that becomes the applied amount for the line
// Then we must subtract the line revenue from the amountAppliedLeft reducing it for future lines that may
// use the invoice

if ($local.amountAppliedLeft[$record['monthInvoiceId']] >= netRevenue) {
    $record.lineAmountApplied = netRevenue;
    $local.amountAppliedLeft[$record['monthInvoiceId']] = $local.amountAppliedLeft[$record['monthInvoiceId']] - netRevenue
} else {
    // If amount left is less than the line amount, then we make the line applied amount equal
    // to the amountAppliedLeft and set the amountAppliedLeft to zero.
    $record.lineAmountApplied = $local.amountAppliedLeft[$record['monthInvoiceId']]
    $local.amountAppliedLeft[$record['monthInvoiceId']] = 0
}

if ($record['monthCreditId'][0]) {
    $record.lineAmountApplied = 0
}

// keep the credit from being show twice if applied to two lines
// NOTE: only looking at first credit if more than one applied to a line
if ($local.credits[$record['monthCreditId'][0]]) {
    $record['month_credit_id_assoc_invAmount'][0] = 0
}
$local.credits = { ...$local.credits, [$record['monthCreditId'][0]]: true }
Deferral Report
Experimental report. Test and verify before distribution.
NOTE: The one caveat of this report is that it will not report on Cancelled campaigns.
This report is working to mimic the Deferred A/R Report in Naviga -> https://xxx.navigahub.com/EW/XXX/accounting/deferred_revenue_report
[NAVIGA]-Deferred Revenue - This Ad Hoc report will pull in the deferred Journal entries to calculate the total deferred amount. It then joins to the [NAVIGA]-Deferred Receivables dataset to get the billing information. It then calculates the Deferred Balance by subtracting the Total Billed from the Total Deferred.
[NAVIGA]-Deferred Receivables - This dataset calculates the Total Billing and Billing this Period. Base mapping is AR Invoices
COA Report
The Cash on Account (COA) report provides a breakdown of customer payment balances to distinguish between funds that are truly available and those already committed to orders. By isolating Whole COA, Prepayment Amount, and True COA, the report shows unallocated cash versus committed prepayments.
Analysis
This analysis aims to distinguish between different types of customer cash balances to provide accurate reporting of available funds. We need to separate total cash balances from committed prepayments to determine the true amount of uncommitted cash available. This involves calculating three key metrics: Whole COA (total unallocated payments), Prepayment Amount (cash committed to orders), and True COA (genuinely available uncommitted cash).
How do we distinguish between different types of customer cash balances to understand how customer payments are being used. This involves calculating three key metrics:
Whole COA represents all unallocated payment balances - money that customers have paid but hasn't been applied to specific invoices yet. True COA is the portion of that money that's completely free to use - not committed to any orders or invoices. Prepayments represent money that's been earmarked for specific orders but hasn't been applied to invoices for those orders yet. The key insight is that Whole COA includes both truly available cash and cash that's already committed to orders, so you need to subtract the committed amounts to get the True COA.
Key Formulas and Calculations
Whole COA
Total payment balances that have not yet been applied to invoices. This represents all cash received from customers that remains unallocated.
SUM of all CHECK_BAL <4> values WHERE CHECK_BAL > 0
Prepayment Amount
Cash that has been committed to specific orders but not yet applied to invoices. This calculation determines the remaining uncommitted portion of prepayments by subtracting what has already been applied from the original prepayment amount.
Multiple records may exist for a single payment transaction, so all applicable amounts must be summed.
SUM of (PP.AMOUNT <71> - PP.APPLIED.AMT <460>)
FROM AD Internet Campaigns
WHERE AR Cash -> ID = AD Internet Campaigns -> PP.TRANS.ID <69>
True COA
Genuinely uncommitted cash available for use. This represents customer funds that are not tied to any specific orders or commitments.
If the calculation results in a negative value, return zero. This can occur when prepayment commitments have been partially refunded, leaving the committed amount higher than the actual available balance.
True COA = Whole COA - Prepayment Amount
IF result < 0, THEN True COA = 0
Key Data Sources:
- CHECK_BAL <4> from AR Cash records
- PP.AMOUNT <71> and PP.APPLIED.AMT <460> from AD Internet Campaigns
- PP.TRANS.ID <69> from AD Internet Campaigns for linking records from AR Cash -> ID
Summary
- Whole COA = Total unallocated payment balances
- Prepayment Amount = Committed but unapplied order funds
- True COA = max(0, Whole COA - Prepayment Amount)
Budget Reports
Sample Rep Format Budget Report
Budgets can be stored in three different mappings, AD Internet Budgets, AD Internet Rep Budgets or AD Internet Rep Format Budgets. Depending on how you want to track your Budgets, your data may appear in one or more of the above mappings.
Each work in a similar manner, so the example below will be for the AD internet Rep Format Budgets mapping.
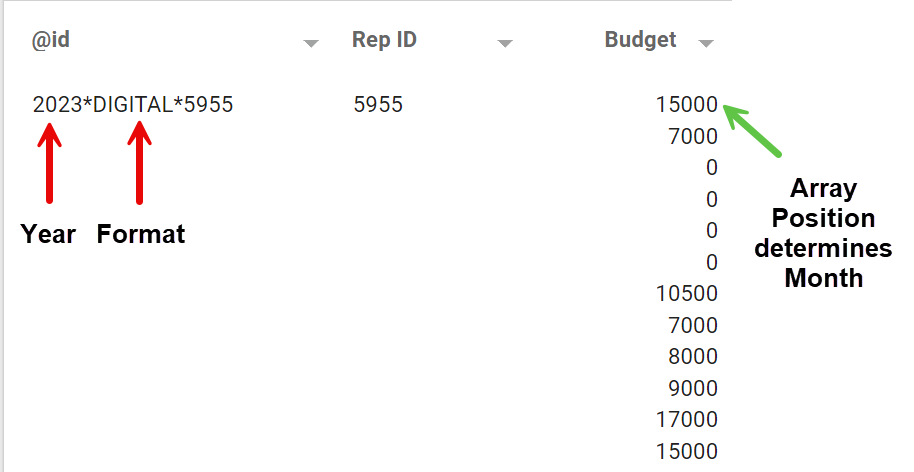
The data is stored WITHOUT an implicit date field. Instead the information for the Year is embedded in the ID field and the Month information is stored positionally in the Budget field.
We need to take the @id field and extract the Year and Format from it (See red arrows). The Rep ID is the last item of the ID, but we already have that as a separate field.
We will then infer the month based on the position of the budget amount in the array. Since arrays are zero based, we will need to add +1 to each element's position.
The attached report manipulates the data using the following Powerscript:
// The budget amounts are stored in a MV field and they are in month order
// Index 0 = Jan, 1 = Feb, etc.  We add one to the index to get the correct month numbers
$record.month = $record.budget.map((el, index) => index + 1)
// String of the above to be used in joins if needed
$record.monthString = $record.month.map(el => el.toString().padStart(2, "0"))

// The Year and the Format is stored in the ID field
// We split that field and take what we need
$record.budgetYear = $record.id.split("*")[0]
$record.printOrDigital = $record.id.split("*")[1]
The report then adds a Normalize flow step on the MV fields to get the final output.
Adding Budget data to another Dataset
Most likely you will want to join the budget data to another dataset so that you can compare the budget data to the actual revenue being earned.
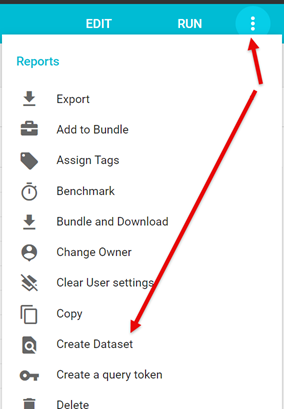
To do this, you will first need to convert the Ad Hoc Budget report into a dataset. This is easily done by:
- Run the Ad Hoc report
- From the Actions menu choose "Create Dataset"
You can now join this dataset to another dataset, however, be aware that when you join the budget data to another dataset that have its revenue data at a different granularity, you will need to make sure to "fix" the budget data so that it is not duplicated to the target datasets granularity.
For example, our budget data is showing budgets by Month-Year-Rep-Format, but our Revenue data may be displayed down to the Line detail level. Which means our budget data will be duplicated for every line that a Month-Year-Rep-Format exists for.
To make sure we only see one budget amount per Month-Year-Rep-Format, we need to use the calculateAggregates Saved Function to get the budgets showing the way that is needed.
Here is an example that can be used if you add budgets to a dataset getting data from AD Internet Orders.
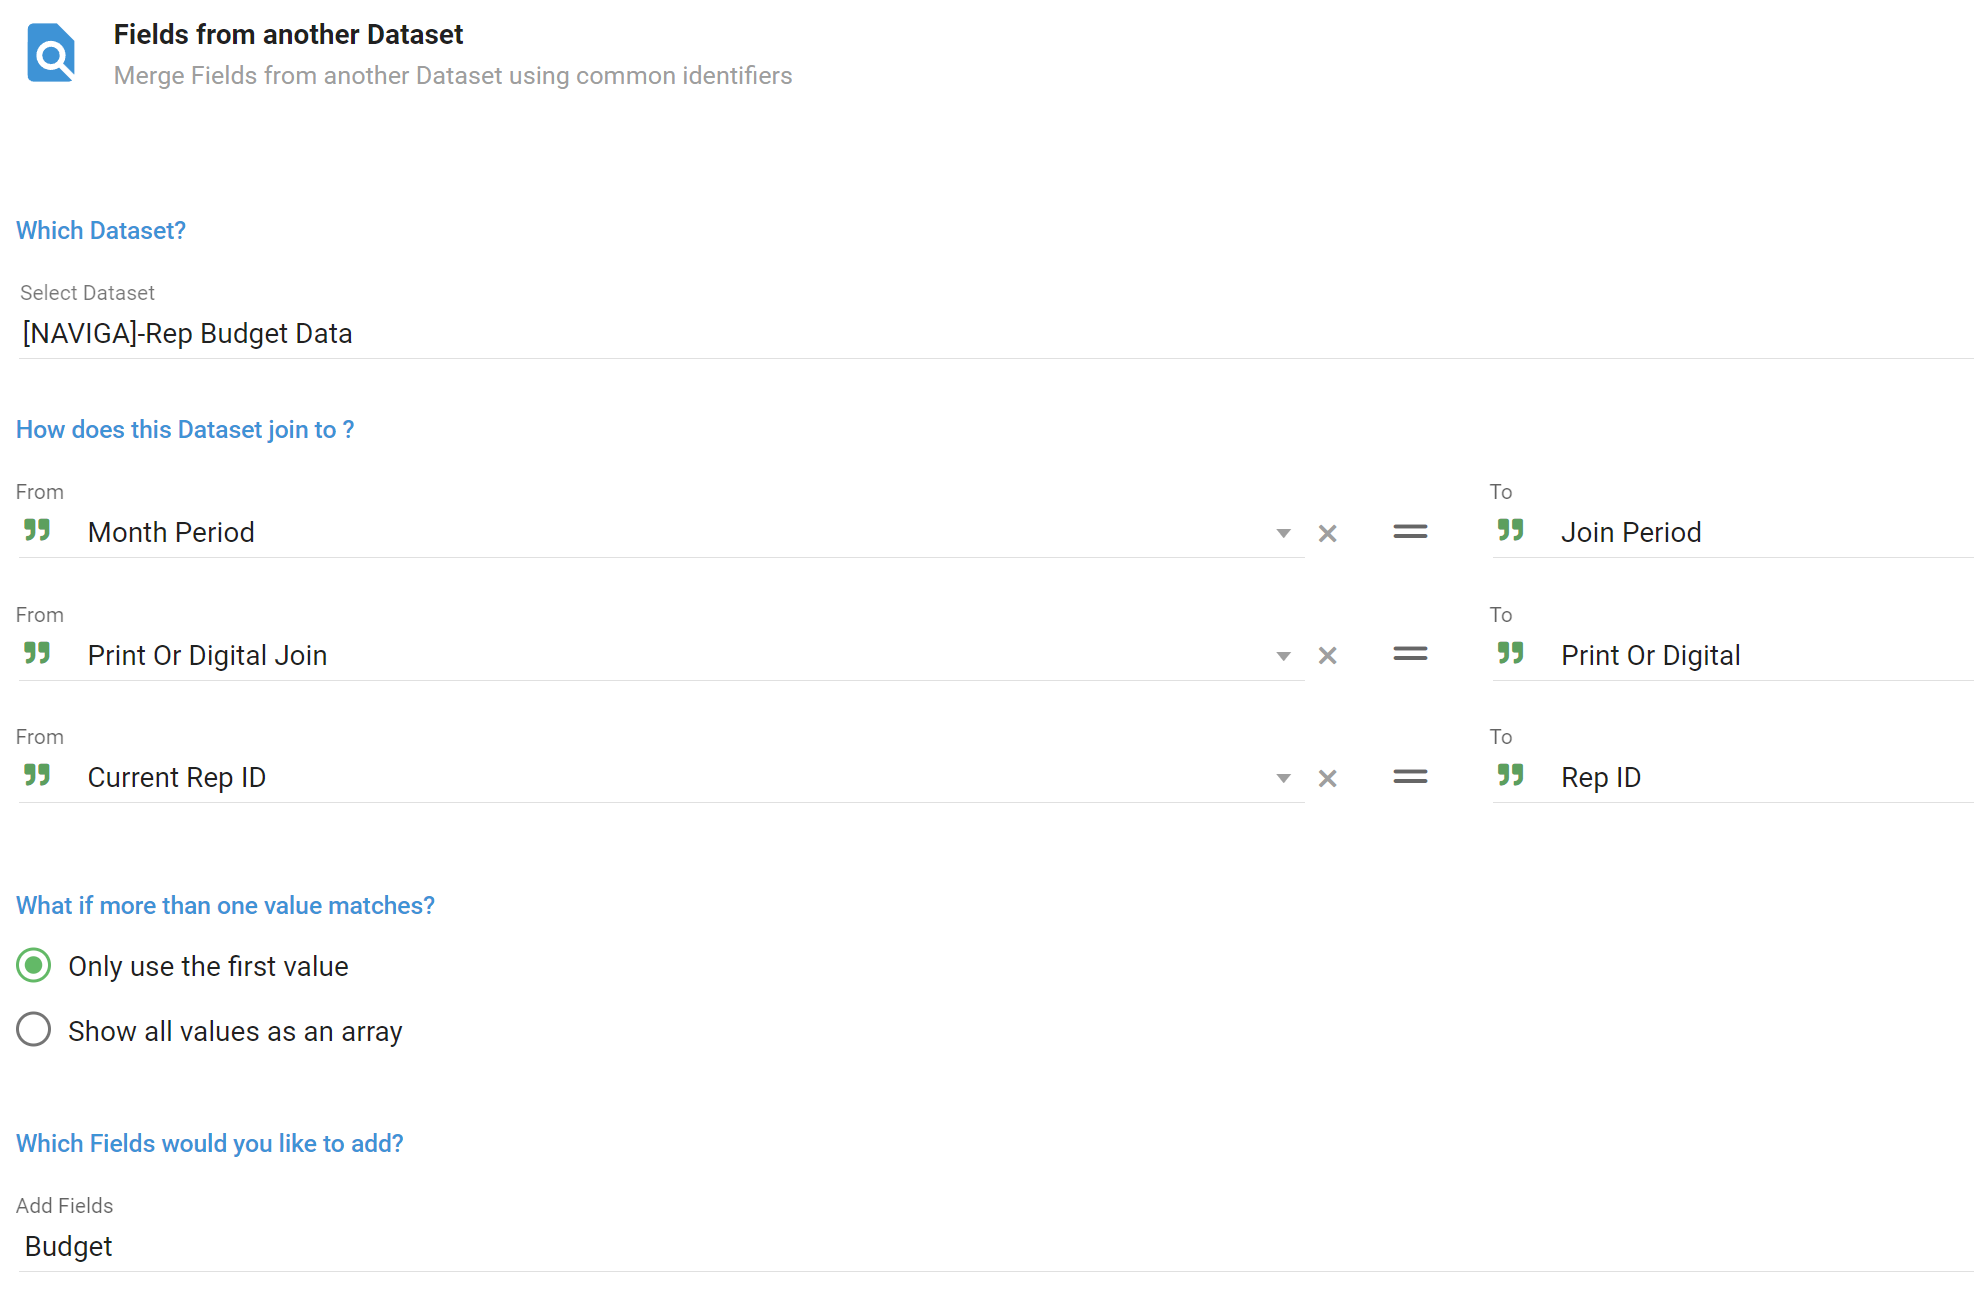
Step 1
Get data from your budget dataset.
Step 2
Aggregate Calculation Powerscript
// Based on PrintPubInd create new field with "Print" or "Digital"
$record.printOrDigitalJoin = $record['web_site_id_assoc_printPubInd'] === "Y" ? "PRINT" : "DIGITAL"
// Define your group keys on the $record object so that
// you can reuse them in the Post Aggregation function
$record.groupKey1 = `${$record['currentRepIds']}-${$record['printOrDigitalJoin']}-${$record['monthPeriod']}`;
groupKeys = [
  {
    name: "Year",
    groupKey: $record.groupKey1,
  }
];

groupAggr = [
  {
    name: "budget",
    initValue: 0,
    value: $record['budget'],
    type: "replace"
  },
];

// Calling the calculate aggregates in a Powerscript
naviga.calculateAggregates({ $local, groupKeys, groupAggr });
Step 3 ADD A Flush Flow Step
Step 4
Post Aggr Powerscript.
// Get the group keys you defined in your Calc aggregations Powerscript
groupKey1 = $record.groupKey1
$record.budget = 0

// GROUP KEY 1
if (!$local[groupKey1].GroupSet) {
  $record.budget = $local[groupKey1].budget;
  $local[groupKey1].GroupSet = true; //Setting to true means we will not excute this code again during the load.
}
Material Production Status
To get the Material Production status, we need to first create a dataset that reads the AD Production Workflow Header mapping and pulls the Product ID out of the ID.
Download -> naviga-production-status-mapping
This dataset is then joined to other datasets that have the Material Status and Product values to join to this dataset.
If you are getting the Material status from AD Internet Orders, you will need to include some Powerscript code to make sure you get the correct Material status as depending on the type of Order the Material status could be in the Month Material Status field or in the Material Status field, both of these are in AD Internet Orders.
The below example will also create the [NAVIGA]-Product Status Mapping dataset.
Download naviga-production-status-on-orders.tgz
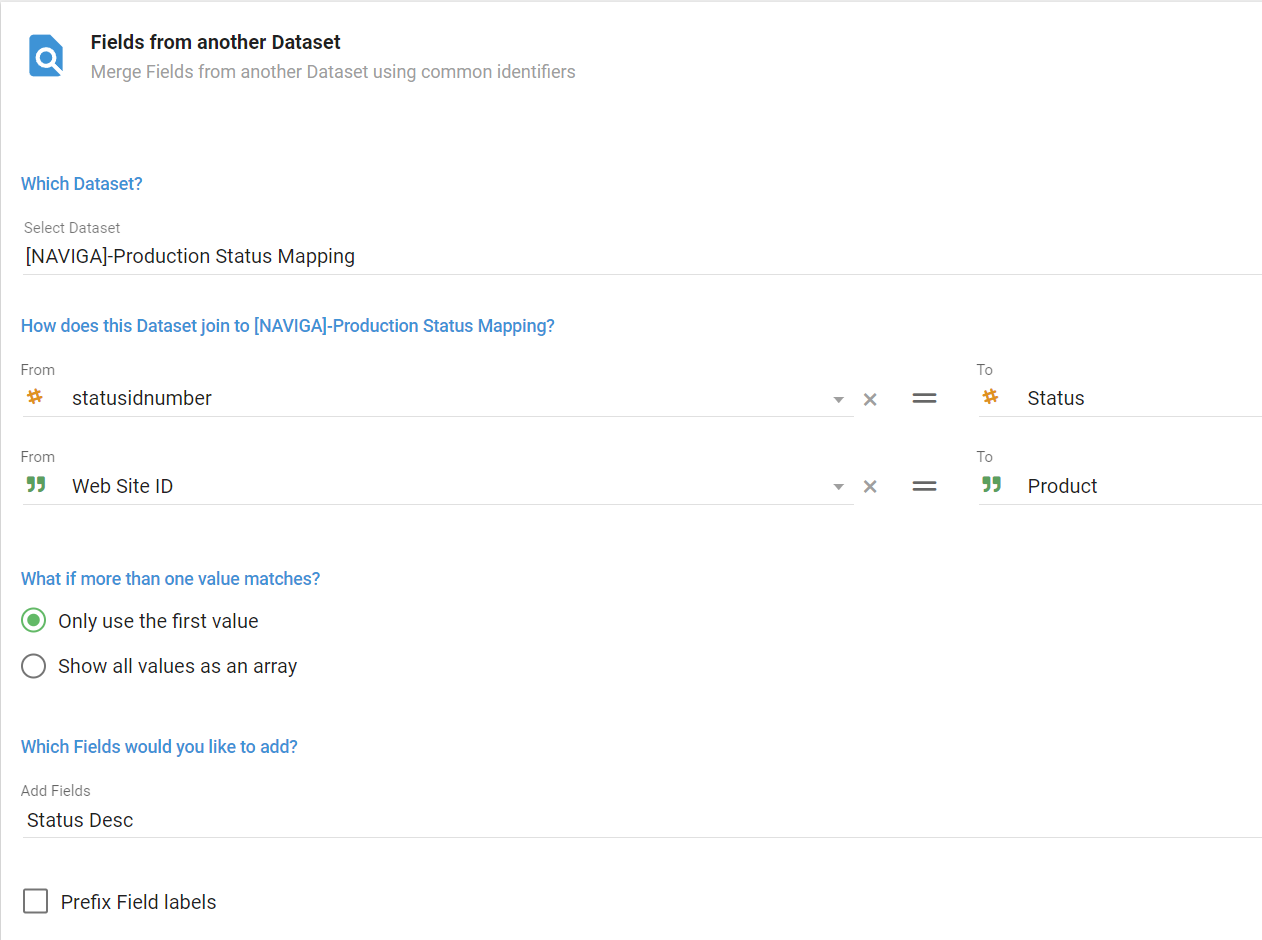
When joining to the [NAVIGA]-Product Status Mapping dataset, you can do so as follows:
The statusidnumber above is calculated in the Powerscript below. This takes into account that sometime the Material status is in Month Material Status field and sometimes in the Material status field:
// Look for status id in MonthMaterialStatus and if that doesn't exist use the MaterialStatus
// field.
// This will be used to join to the Product Status Mapping dataset along with Product ID to get
//the Material Status Description
finalMaterialStatus = !$record['monthMaterialStatus'] || $record['monthMaterialStatus'].length === 0 ? $record['materialStatus'] : $record['monthMaterialStatus']
$record.statusidnumber = parseInt(finalMaterialStatus)
New Business Flag
IN PROCESS FEATURE - Create a lapsed customer option. This would check a customers last order date against today's date and if it was greater than x months, we would mark the customer as lapsed. Most likely you will want Lapsed Months to be Greater than the INACTIVE months.
Sample New Business Flag Dataset - [NAVIGA]-New Business Flag
Many times there is a need to declare a customer as a new customer after a defined length of inactivity. That is where this code can help.
The code below is based on the AD Internet Campaigns mapping and uses the campaigns Start and End dates to determine inactivity between campaigns.
The fields needed from AD Internet Campaigns are:
- Advertiser ID <1>
- Start Date <4>
- End Date <5>
We MUST set the Order By in the Query to sort Ascending by Advertiser ID AND Start Date. This will group the records by advertiser and also order each advertisers campaign in order of when the campaigns started.
The basic logic will be that as we go through the records, we will compare the previous record to the current record for an advertiser and calculate how much time has passed between the End Date of the previous record and the Start Date of the current record.
The date calculations are based on the first of the month. For example, if the end date is 01/15/2022, the code will use 01/01/2022 for the comparison.
Many Advertisers will have overlapping campaigns, where the end date of one is After the start date of the previous:
camp 1, startDate 01/01/2020 End Date 01/01/2021 camp 2, startDate 05/02/2020 End Date 07/01/2020
This is OK, as in the calculations the result will be negative and is handled.
There are some constants that you will set in the first part of the script that will define how the application sets the New Business status.
- INACTIVE_MONTHS_LIMIT - How many months of inactivity must a client have before being designated as "New" business
- PROBATION_MONTHS - Many times you also want to know how long a customer has been identified as "New" business. For example, if a customer starts doing business with your company, you would want them to retain that new status for a certain amount of time. This is referred to as the Probationary Period in the code. It is defined in months.
- INACTIVE_MONTHS_LIMIT - How many months of no orders before we mark this customer as "Inactive".
- NEW_STATUS_TEXT - Text to use in the finalSalesStatus field when the client is "New"
- EXISTING_STATUS_TEXT - Text to use in the finalSalesStatus field when the client is not "New"
- INACTIVE_STATUS_TEXT - Text to use in the finalInactiveStatus field when the client is considered "Inactive"
- ACTIVE_STATUS_TEXT - Text to use in the finalInactiveStatus field when the client is considered "Active"
Here is the code for the Constants.
//=====================
//-- Constants - All checks are Exclusive (months between < LIMIT value)
//-- This is the number of months of inactivty between current and last ad before we call the customer new
TIMETONEW_MONTHS_LIMIT = 12;
//-- Number of months AFTER a customer is declared "new" that we keep their status as "New"
PROBATION_MONTHS = 3;
//-- Number of months without an order to have customer's "finalInactiveStatus" set to the Inactive Text
INACTIVE_MONTHS_LIMIT = 4

// Status Text
NEW_STATUS_TEXT = 'New';
EXISTING_STATUS_TEXT = 'Existing';
INACTIVE_STATUS_TEXT = 'Inactive'
ACTIVE_STATUS_TEXT = 'Active'
//=====================
Visual Overview of a Couple of Scenarios
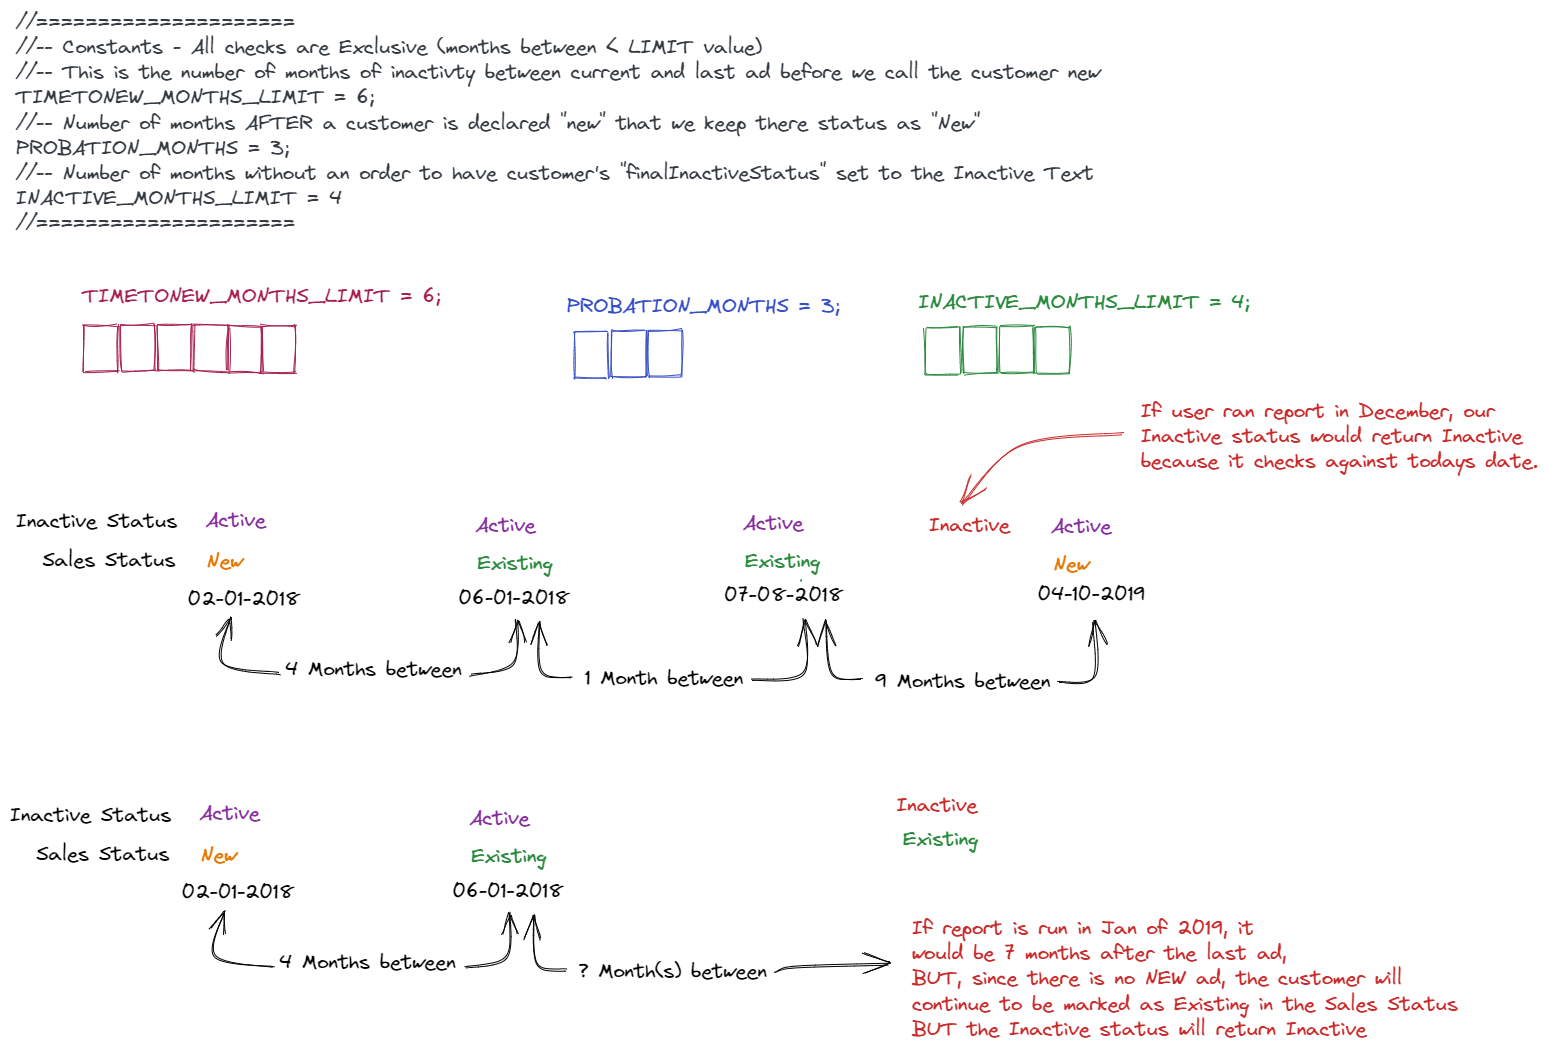
If a customer's last transaction gave them a Sales Status of "New" and it has been more than the "INACTIVE_MONTHS_LIMIT", you will see that customer listed as "New" and "Inactive". This just means that they never had a transaction after the probationary period.
Definitions of some Variables
- lastActivityDate - the previous record's "last activity" date. Maybe the Month End Date of Campaign At the start of the Powerscript, this date will be pulled from $local.previousValues object At the end of the Powerscript, whatever field is deemed to be the lastActivityDate, will be pulled from the current record and stored as the lastActivityDate in the $local.previousValues object
- currentActivityDate - the current record's "current activity" date. Maybe the Month Start Date of Campaign
- startDateOfNewStatus - gets set to the lastActivityDate of the current record when there has been no activity for 12 months This date does not get reset until there is another 12 month period of inactivity. This is because a "new" advertiser, stays new for 12 months after becoming new. After 12 months of activity, status will change to "existing"
Persistent Objects - These object will persist over every row processed
- $local.previousValues - This object will contain the "advertiserId" and "lastActivityDateMoment" from
the PREVIOUS record.
If this is the first record (meaning this variable is
undefined) we initialize to: { advertiserId: null, lastActivityDateMoment: moment(null) } One of the final steps of the Powerscript is to update this Object with the current records advertiser id and "lastActivityDate", which will then be the next records "PREVIOUS" values. - $local[advId] - Since we are using the record's advertiser id as a key on the $local object, all the values stored will be overwritten as we progress through the Advertisers campaign records.
Main Script
//=====================
//-- Constants
//-- This is the number of months of inactivty between current and last ad before we call the customer new
TIMETONEW_MONTHS_LIMIT = 12;
//-- Number of months AFTER a customer is declared "new" that we keep there status as "New"
PROBATION_MONTHS = 3;
//-- Number of months without an order to have customer's "finalInactiveStatus" set to the Inactive Text
INACTIVE_MONTHS_LIMIT = 4

// Status Text
NEW_STATUS_TEXT = 'New';
EXISTING_STATUS_TEXT = 'Existing';
INACTIVE_STATUS_TEXT = 'Inactive'
ACTIVE_STATUS_TEXT = 'Active'
//=====================

// get $local object and initialize if they don't yet exist
previousValues = $local.previousValues
  ? $local.previousValues
  : { advertiserId: null, lastActivityDateMoment: moment(null) };

// Get Info for setting $local Adv Bucket
AdvId = $record['advId'];
//!! This is the date of activity for the current record.  It will be compared to
//!!    the previous records "lastActivityDateMoment" field.
currentActivityDateMoment = moment($record['startDate']).startOf('month');

// Initialize AdvId bucket in $local var
$local[AdvId] = $local[AdvId]
  ? $local[AdvId]
  : {
      SalesStatusWorking: {
        salesStatus: NEW_STATUS_TEXT,
        startDateOfNewStatus: currentActivityDateMoment,
        inactiveStatus: ACTIVE_STATUS_TEXT,
        isLastRecord: false,
        counter: 0,
      },
    };

//--- Setup Variables
// Pull previous values into vars
lastActivityDateMoment = previousValues.lastActivityDateMoment;
startDateOfNewStatus = $local[AdvId].SalesStatusWorking.startDateOfNewStatus;

currMinusPrevDate = currentActivityDateMoment.diff(
  lastActivityDateMoment,
  'months'
);
currDateMinusCurrStartDOfNS = currentActivityDateMoment.diff(
  startDateOfNewStatus,
  'months'
);

// Months since last order from todays date
// We will use this to determine if we should use Active Text or Inactive Text
inactiveCheckMonths = moment().diff(currentActivityDateMoment, 'months')
inactiveText = inactiveCheckMonths > INACTIVE_MONTHS_LIMIT ? INACTIVE_STATUS_TEXT : ACTIVE_STATUS_TEXT;

isNewAdvertiser = previousValues.advertiserId !== $record['advId'];

// If the previous record was the final one for the previous advertiser, then set the
//     $local[previousAdvertiserid]"isLastRecord" flag to true.
// Used in the final script to determine the correct sales status.
if (isNewAdvertiser && previousValues.advertiserId) {
  $local[previousValues.advertiserId].isLastRecord = true;
}

// boolean - if true, cust marked as new with startDateOfNewStatus reset to currentActivityDateMoment
isOver12MonthsSinceLastOrder = currMinusPrevDate > TIMETONEW_MONTHS_LIMIT;
isPastProbationPeriod = currDateMinusCurrStartDOfNS > PROBATION_MONTHS;

// ------ DEBUGS Start -----
// $record.DEBUG_prevAdvertiser = previousValues.advertiserId;
// $record.DEBUG_lastActivityDateMoment =
//   previousValues.lastActivityDateMoment.format('MM-DD-YYYY');
// $record.DEBUG_startDateOfNewStatus = startDateOfNewStatus;
// $record.DEBUG_dateTestCurrMinusPrev = currMinusPrevDate;
// $record.DEBUG_currDateMinusCurrStartDOfNS = currDateMinusCurrStartDOfNS;
// $record.DEBUG_isPastProbationPeriod = isPastProbationPeriod;
// $record.DEBUG_isOver12MonthsSinceLastOrder = isOver12MonthsSinceLastOrder;
// ------ DEBUGS End -----

// Do some logic to figure out what we should make the sales status and "StartDateOfNewStatus"
if (isNewAdvertiser || isOver12MonthsSinceLastOrder) {
  // This object will persist between records
  // Stores advertiser's current status and the date of when they "acquired" that status
  // Whenever we start on a new advertiser, they are assumed "New"
  $local[AdvId].SalesStatusWorking = {
    salesStatus: NEW_STATUS_TEXT,
    startDateOfNewStatus: currentActivityDateMoment,
    counter: $local[AdvId].SalesStatusWorking.counter + 1,
  };
} else {
  // Setting counter.  Maybe use to determine last salesStatus
  $local[AdvId].SalesStatusWorking.counter =
    $local[AdvId].SalesStatusWorking.counter + 1;


  // Check if out of probationary period, if so, then set Existing status text
  if (isPastProbationPeriod) {
    $local[AdvId].SalesStatusWorking.salesStatus = EXISTING_STATUS_TEXT;
  }
}
  // Setting counter.  Maybe use to determine last salesStatus
  $local[AdvId].SalesStatusWorking.counter =
    $local[AdvId].SalesStatusWorking.counter + 1;
  $local[AdvId].SalesStatusWorking.inactiveStatus = inactiveText;
//Before going on to the next record, store the "previous" values
$local.previousValues = {
  advertiserId: $record['advId'],
  lastActivityDateMoment: moment($record['startDate']).startOf('month'), // This will be a moment Object
};

// Expose the current info from our SalesStatusWorking object as records for this transaction
// The $record.counter is very important for the post flush powerscript
// It lets us know and compare last record's counter to it, so that we know
// which transaction was the last record for the given advertiser.
$record.workingSalesStatus = $local[AdvId].SalesStatusWorking.salesStatus;
$record.counter = $local[AdvId].SalesStatusWorking.counter;
FLUSH Flow Step
// Put a Flush Flow Step here
Set the Last Record Flag
//!!!!--- Finalize Script - Set Last Record ---!!!!//
advId = $record["advId"];
$record.isLastRecord = false;
$record.workingcounter = $local[advId].SalesStatusWorking.counter

if ($local[advId].SalesStatusWorking.counter == $record.counter
) {
  // We need to move the last record flag out of the $local variable and onto the record itself.
  $record.isLastRecord = $local[advId].isLastRecord || true;
  $record.finalSalesStatus =  $local[advId].SalesStatusWorking.salesStatus;
  $record.finalInactiveStatus = $local[advId].SalesStatusWorking.inactiveStatus
}
FLUSH Flow Step
// Put a Flush Flow Step here
Remove Non Final Status
// Uncomment to only show FINAL Sales Status
// This make it so that you have only a single row per customer.
if (!$record.isLastRecord) $omit()
Remove Fields
You can also add a Remove Fields flow step to remove the following fields:
- Campaign ID
- Working Sales Status
- Counter
- Start Date
- End Date
- Is Last Record
Union Two Datasets
This guide shows you how to combine data from multiple Informer datasets into a single result using Web Query and Informer's REST API.
What You're Doing
You'll create a Web Query that pulls data from Informer's own API to combine multiple datasets. Think of it as having Informer report on its own data from different sources.
Before You Start
1. Set Up API Access
- Create a Web Datasource for Informer's API (if you don't have one)
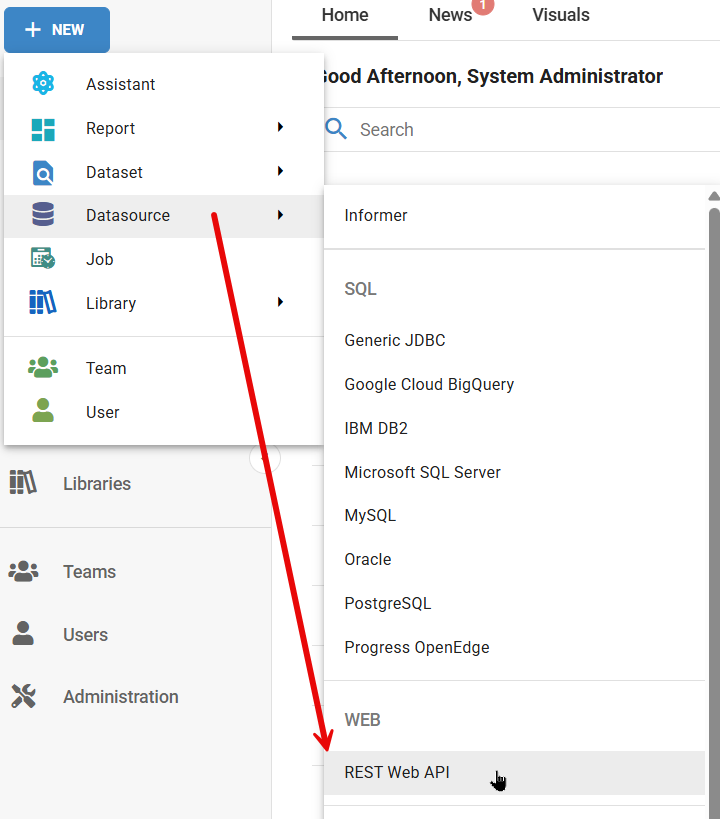
- You can either create a Read-only Full API Key with Bearer Token Authorization OR use Basic Auth and login using a username and password.
2. Choose Your Datasets
- Identify 2 or more datasets you want to combine
- Important: If you have fields that have the same data (Client ID, Campaign ID, etc) that you want to show up in the same field, make sure the field aliases are identical for these fields.
- Fields that don't match will show as blank in some records. Meaning, if you have Client ID in Dataset 1, but not in Dataset 2, when loading Dataset 2, the Client ID field will be blank.
3. Get Dataset IDs
- Go to your Home page or Dataset listing
- Click the info (i) icon next to each dataset
- Copy the Dataset ID (it looks like:
09d20fb8-6ee4-4883-bb1a-6306159afdfb)
Creating the Union Query
Now we need to create a Web Query dataset that will Union our datasets together.
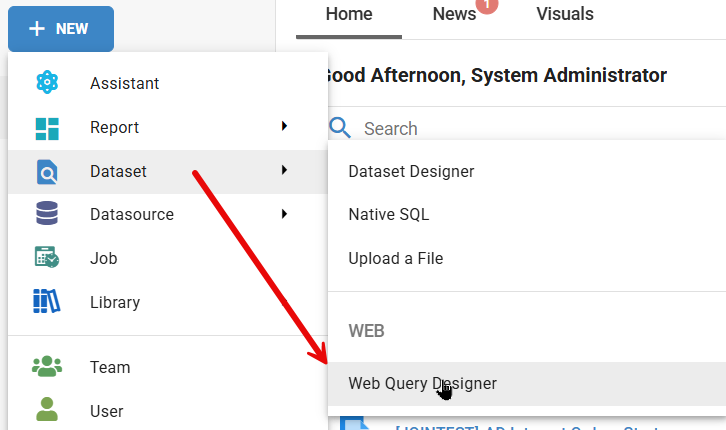
Step 1: Create the Web Query
- Create a new Web Query using your Informer API datasource
- Set the Method to
GET - Set the URL to:
api/datasets/{first-dataset-id}/data- Replace
{first-dataset-id}with your actual first dataset ID - Example:
api/datasets/c7626adf-0456-4f13-8712-b3c18b06156d/data
- Replace
Step 2: Add the Response Parser Script
- In the Response Parser section, select Custom Script
- Paste the union script (provided below)
- Important: Update the
datasetsarray in the script with your additional dataset IDs
COPY/PASTE this Script
/**
 * Dataset Union Query Script for Informer Web Query
 *
 * This script unions multiple datasets together by sequentially processing each one.
 * The first dataset should be configured in the Method & URL tab of the query interface.
 * Additional datasets are specified in the array below and will be processed in order.
 */

// Configuration: List of additional dataset IDs to union with the primary dataset
// The first dataset is configured in the Method & URL tab, so only specify additional ones here
var datasets = [
    'your-second-dataset-id-here',
    'your-third-dataset-id-here-if-needed',
    // add more as needed
];

//======DO NOT EDIT BELOW THIS LINE-Unless you know what you want========

// Extract the current dataset ID from the response URL
var currDatasetId = response.config.url.split('/')[2];

// Determine the next dataset to process
// Find the current dataset's position in the array and increment by 1
var nextDatasetIndex = datasets.indexOf(currDatasetId) + 1;

// Check if there are more datasets to process after the current one
var hasMoreDatasets = nextDatasetIndex < datasets.length;

// Add the current dataset ID to each record for tracking purposes
var recordsWithDatasetId = response.data.items.map(record => ({
    ...record,
    id: currDatasetId
}));

// Add the processed records to the result set
push(recordsWithDatasetId);

// Determine next action based on pagination and dataset availability
if ((response.data.start + response.data.count) < response.data.total) {
    // More pages available in current dataset - fetch next page
    next({
        ...response.config,
        params: {
            ...response.config.params,
            start: response.data.start + response.data.count
        }
    });
} else if (hasMoreDatasets) {
    // Current dataset complete, move to next dataset in the union
    next({
        ...response.config,
        url: `api/datasets/${datasets[nextDatasetIndex]}/data`,
        params: {
            ...response.config.params,
            start: 0  // Reset pagination for new dataset
        }
    });
}
// If no more pages and no more datasets, the union operation completes automatically
Step 3: Test and Run
- Save your Web Query
- Run it to test the union
- The query will automatically:
- Process all records from the first dataset
- Move to the second dataset
- Continue until all datasets are processed
- Handle pagination automatically
How It Works
- The script processes datasets one at a time
- It handles pagination within each dataset automatically
- Each record gets tagged with its source dataset ID
- The final result combines all datasets into one unified output
Code Overview This JavaScript script is designed for use within the Informer Web Query platform to create a union of multiple datasets. The script implements a sequential data processing approach that combines records from multiple datasets into a single result set.
The script works by first processing the primary dataset (configured in the query interface), then automatically moving through additional datasets specified in the datasets array. It handles pagination within each dataset by fetching all available pages before moving to the next dataset. Each record is tagged with its originating dataset ID for traceability. The union operation continues until all datasets have been fully processed, creating a comprehensive combined dataset that maintains the structure and integrity of the original data while providing a unified view across multiple data sources.
The key feature of this implementation is its ability to handle large datasets through automatic pagination management and its sequential processing approach that ensures all data is captured without overwhelming system resources.
GEN Security File Report
This section has the sample files and explains in detail how to build a report that takes the fields from the GEN Security File mapping in Informer and transforms it into a more readable and usable format. Steps 1-10 will get you a report that has the following format.
| User Group | Security Field Name | Security Field Value |
|---|---|---|
| ROOT | Advertisers - Client type... | Y |
| ROOT | Allowed to apply... | N |
| ... | ||
| CLIENT | Advertisers - Client type... | N |
| CLIENT | Allowed to apply... | N |
| ... |
Continuing to follow the steps after step 10 will transform the report into a cross tab report, with the User Groups going across the top of the report.

Before starting, make sure to review the prerequisites and download the sample files.
Prerequisites
- You MUST have v2 of the
calculateAggregatessaved function installed. Get Code Here - You must be on Informer version 5.2 or above
Sample Files
SecurityMappingLabelDescriptions.csv File
Datasource Metadata For Security Report - Dependent on the Security Mapping Spreadsheet being uploaded into a Workspace
Security Crosstab with Columns Sample Dataset - Dependent on Datasource Metadata For Security Report for HNP Security
Setup For Building Dataset
Step 1 Create Upload spreadsheet
This CSV file has already been created for you, it can be downloaded above. However, if you want to modify any of the sml_field_description values, you may. You may also modify the sml_screen and sml_screen_order field values.
The attribute number is used to join to the Metadata and the Field Description to build our new label.
The only fields we use in this version of the report are:
- sml_field_description
- sml_attribute_number
- sml_screen
- sml_screen_order - this field holds the order of the fields as they appear in the Naviga security screen.
All other fields are for informational purposes. If you find they are difficult to get into the spreadsheet, you can omit them.

Once you have created this file, you will upload it into a Workspace -> Security Mapping Label Descriptions
If you make any changes in the spreadsheet, you MUST upload and replace the data in the Workspace!
Step 2 "Datasource Metadata For HNP Security" Dataset
The next step is to get Metadata for the GEN Security File mapping. This dataset was created to get that information:
If anything has changed in the Spreadsheet from Step 1 and you have uploaded it into the Workspace, you first need to refresh this dataset.
I found discrepancies in the metadata JSON field "Field Data" for the alias name.
To work around this, I used the FIeld Id in from the Mapping mapping and used it to calculate the field Alias. The Field Id is what you see in the datasource mapping lists in the format "FIELD.NAME". However, sometimes the value separating words is a period "." and sometimes an underscore "_".
Here is the code.
// Below code is creating a calculated field for the field name to join with our main dataset
// I found that certain fields were getting incorrect alias names when pulling from teh field_data JSON file.
// This one is calculating from teh Field ID.
splitDelimiter = $record['field_fieldId'].indexOf(".") > 0 ? "." : "_"
fieldNameArray = $record['field_fieldId'].split(splitDelimiter) // $record['field_data'].name.split(" ")

lastFieldVals = fieldNameArray.slice(1).map(el => el.toLowerCase()[0].toUpperCase() + el.slice(1).toLowerCase())
$record.dfieldAliasCalced = fieldNameArray[0].toLowerCase() + lastFieldVals.join("")
I point this out, because we use the calced field as the Join field in the final dataset and if you see any field that isn't pulling its description, first look to this value to make sure it is "calculating" the correct alias.
Once refreshed, you can export it to excel for reference. The fields of interest are:
- Field Label Expression - Used in the HNP Security dataset to update the label of fields with descriptions.
- Condense Multi Valued Expression - Used in the HNP Security dataset to convert multivalued fields to a string of values
- Object Map Pair - --NO LONGER NEEDED-- The key/value pairs was extracted and used to create a lookup object in the naviga.securityMapLookup saved function
- SML Screen - Informational value identifying which Naviga Screen this field comes from
However, the fields that contain the information you need for the Powerscripts in the final dataset can simply be copied and pasted from the dataset. These are:
-
Final Condense Multi Valued Expression - Used in the HNP Security dataset to convert multivalued fields to a string of values.
NOTE: There may be some MV fields that need additional processing and this will take place in the Flow step during the final report build.
-
Final Alias Array - Used in the HNP Security dataset to the field array will tell us the fields in the mapping to process.
-
Final Field Label Expression - NOT USED in the final dataset, but for informational purposes, you could use this code to update the label of fields with descriptions.
-
Final Object Map Pair - --NOT USED-- The key/value pairs will be extracted and used to create a lookup object in the naviga.securityMapLookup saved function
Build the Final Dataset
To transform a dataset with 300+ columns to a Cross Tab we will need to
- Create the following arrays will be created:
- UserGroup - will be the @id (User Group) field
- SecurityFieldLabel - will be the column name
- SecurityFieldValue - will be the column value
- SecurityFieldAlias - used to join to the Dataset-> Datasource Metadata For Security Report
We continue to push values onto these arrays (in the $local object so that they persist between rows) for every row.
Step 1
Create a Dataset pointed to the GEN Security File mapping and then grab ALL of the fields.
ADD Criteria
- WHERE Group Name is Not Empty
Step 2 - Flow Step Powerscript
In this Powerscript, we are defining the $local.fieldsToLoop array. This array is defined in the Final Alias Array field in the Datasource Metadata For Security Report dataset. Just copy and paste it after the "="
Assign FieldsToLoop Local Array
// Create Array of field aliases that we will loop through and "unwind"
$local.fieldsToLoop = ['adClientTypeReqdInd',...,'adCustOption']
Step 3 - Flow Step Powerscript
This script can be modified to meet your needs. Initially, there are many multivalued fields and if you are not sure how to handle them, it is best to simply convert the multiple values into a delimited string list. To determine if a field is Multivalued, there is the Datasource Metadata For Security Report dataset. Simply run this dataset and copy the Final Condense Multi Valued Expression field. It will contain the code that you need to convert all of the MV fields to string delimited.
As an example, the moduleAccessCombined code is showing that you can do custom edits with MV fields if needed. the genWebModuleAccess and genWebModuleCodes are two MV fields that are associated and so, we added them into a single field.
If you create a new field with values as we have done with $record.moduleAccessCombined, you will need to add that field name to the array $local.fieldsToLoop defined in Step 2 above.
Deal with MV Fields
// Deal with Multivalued fields
//-------------------------------
// Custom coversion of a multivalued field
moduleAccessCombined = $record['genWebModuleAccess'].map((el, index) => {
    return `${$record['genWebModuleCodes'][index]} = ${el}`
})

// Since we are creating a new field IT MUST be added to the fieldsToLoop array in the previous powerscript
$record.moduleAccessCombined = naviga.multiValuedToString(moduleAccessCombined, ", ", true)
//-------------------------------

// Convert all multivalued fields to strings - code from "Datasource Metadata For HNP Security" dataset
$record["inClientAccessCodes"] = naviga.multiValuedToString($record["inClientAccessCodes"], ",", false)
$record["inetStatusCodes"] = naviga.multiValuedToString($record["inetStatusCodes"], ",", false)
...
$record["incentiveAutoAdjustCodes"] = naviga.multiValuedToString($record["incentiveAutoAdjustCodes"], ",", false)

//-----------------------------
// The below code will be used to modify any MV fields that need further refinement.
// cmrAdRepScreens has the description fields in an iDescriptor, BUT iDescriptors do NOT Have an attribute number
// to map to
// so we are just copying over the ids with descriptions here.
$record["crmAdRepScreens"] = $record["crmAdRepScrDesc"]
Step 4 - Flow Step Powerscript
Here is the script where we start the process of "unwinding" the fields. This is done by creating 4 arrays for each of the final fields that we want.
Field Mapping
// GEN Security File Field Mapping
//-- Initialize the $local arrays
$local.UserGroup = $local.UserGroup || []
$local.SecurityFieldLabel = $local.SecurityFieldLabel || []
$local.SecurityFieldValue = $local.SecurityFieldValue || []
$local.SecurityFieldAlias = $local.SecurityFieldAlias || []


loopFields = $local.fieldsToLoop
// Loop through the field alias array and build three arrays that will be
// the final three fields in the table
for (let i=0; i < loopFields.length; i++) {
    fieldName = loopFields[i]
    // Make sure field exists in dataset
    if ($fields[fieldName]) {
        $local.UserGroup.push($record['id'])
        $local.SecurityFieldLabel.push($fields[fieldName].label + "_ZZZ")
        $local.SecurityFieldValue.push($record[fieldName])
        $local.SecurityFieldAlias.push(fieldName)
    }
}
Step 5 - Flow Step Flush
We need a flush step because we want to process all of the above steps before proceeding to the next Powerscript.
#FLUSH Flow Step
Step 6 - Flow Step Powerscript
Local To Records
// Copy all of our $local persistant arrays that were created to
// records.  NOTE: These will be 4 large arrays.
// ALSO, since we only need ONE value (hence one row), we delete all other rows
// as we have aggregated the information we need into the below local arrays
if (!$local.firstTime) {
    $record.UserGroup = $local.UserGroup
    $record.SecurityFieldLabel = $local.SecurityFieldLabel
    $record.SecurityFieldValue = $local.SecurityFieldValue
    $record.SecurityFieldAlias = $local.SecurityFieldAlias
    $local.firstTime = true
} else {
    $omit()
}
Step 7 Flow Step Normalize
Next we need to normalize on the four new fields we created above.
Add the Normalize Flow step and choose
- UserGroup
- SecurityFieldLabel
- SecurityFieldValue
- SecurityFieldAlias
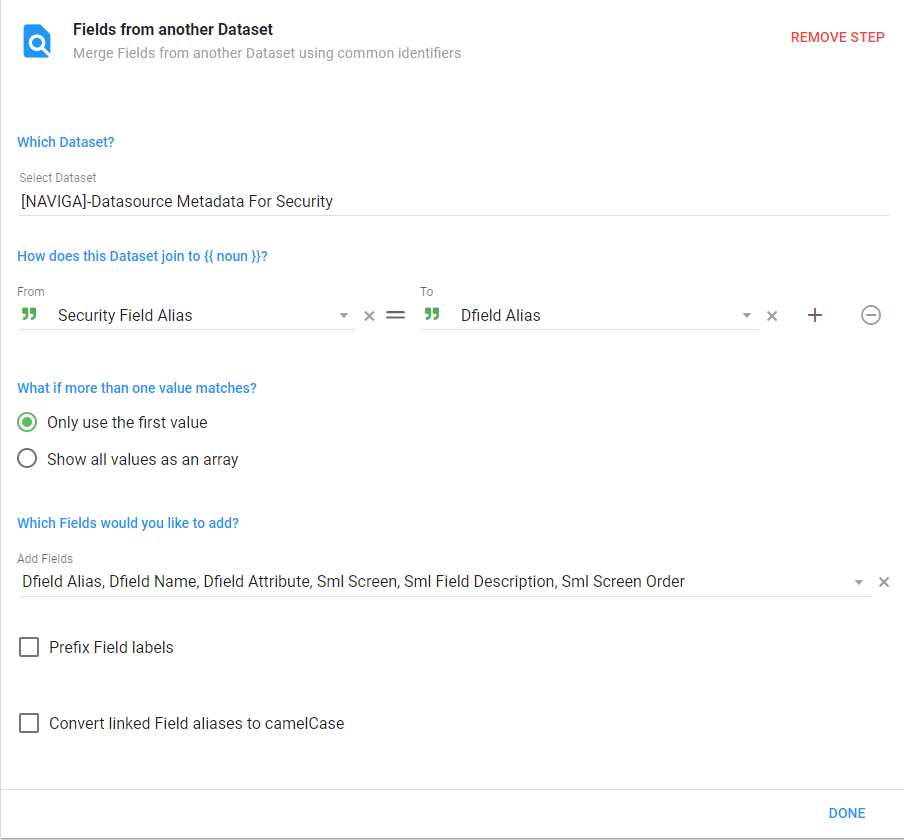
Step 8 Flow Step Field from Another Dataset
There is some information in our Datasource Metadata For Security Report dataset that we need.
Join the Security Field Alias to the Dfield Alias and then pull in the following fields:
- Dfield Name
- Dfield Alias
- Dfield Attribute
- Sml Screen
- Sml Field Description
Step 9 Flow Step Powerscript
Populate Final Field Description
// We expect some fields will not have a Description defined in the Workspace table, if not
// Populate with the original field Label.
$record['FinalFieldDescription'] = $record['smlFieldDescription'] || $record['SecurityFieldLabel']
The completion of Step 9 will give you a dataset with the GEN Security File fields "Unwound". Proceed to Step 10 to remove unneeded fields.
However, if you want to convert this into a Crosstab style report that looks like the image below, SKIP Step 10 and proceed to Step 11.

Step 10 After Run
After you have loaded the data, you will find that you have over 300 fields and you only want/need 4. Click on the "Columns" button and deselect all fields except for the following.
Do not use the Remove Fields flow steps to get rid of the fields. Given how we are building the dataset, this causes issues when I tried in the past. As new versions of Informer are released, this option could be tested again.
Step 11 Flow Step Powerscript
To accomplish the output, we will need to take the User Group field and make all unique values in it their OWN field AND the values of each field must be the corresponding SecurityFieldValue values.
We are going to use the naviga.calculateAggregates saved function to help. Make sure you have version 2, which includes the type option.
Using this function, we will group by the "UserGroup" field and do a special aggregation which will concatenate ALL the value from the following fields:
- SecurityFieldValue - The value for the Field Description.
- FinalFieldDescription - The final field description will be the new description from the spreadsheet, or if that doesn't exist it will be the original label for the field with an "_ZZZ" at the end.
- SecurityFieldLabel - This is the ORIGINAL label for the field.
- SecurityFieldAlias - This is the alias for the field
- smlAttributeNumber - The attribute number of the field. NOTE: this will only be populated for fields that had a description in the spreadsheet/workspace
- smlScreen
- smlScreenOrder
Aggregation Step
// Define your group keys on the $record object so that
// you can reuse them in the Post Aggregation function
$record.groupKey1 = `${$record['UserGroup']}`;
groupKeys = [
  {
    name: "Group",
    groupKey: $record.groupKey1,
  }
];

groupAggr = [
  {
    name: "value",
    initValue: '',
    value: $record['SecurityFieldValue'],
      type:  'concatall'
  },
  {
    name: "desc",
    initValue: '',
    value: $record['FinalFieldDescription'],
      type:  'concatall'
  },
  {
    name: "label",
    initValue: '',
    value: $record['SecurityFieldLabel'].replace("_ZZZ", ""),
    type:  'concatall'
  },
  {
    name: "screen",
    initValue: '',
    value: $record['smlScreen'],
    type:  'concatall'
  },
  {
    name: "screenOrder",
    initValue: '',
    value: $record['smlScreenOrder'] ,
    type:  'concatall'
  },
  {
    name: "attributeNum",
    initValue: '',
    value: $record['dfieldAttribute'],
    type:  'concatall'
  },
  {
    name: "alias",
    initValue: '',
    value: $record['SecurityFieldAlias'],
    type:  'concatall'
  },
];

// Calling the calculate aggregates in a Powerscript
naviga.calculateAggregates({ $local, groupKeys, groupAggr });
Step 12 Flow Step FLUSH
#FLUSH Flow Step
Step 13 Flow Step Powerscript
This is where things get trickly. We are still only working on the $local object. This means that we need the values to persist.
In this step we should only have one row for each UserGroup field. Each of these rows will have other fields that contain arrays of all the security fields and values. We are going to store all of this information in a new Key on the $local object called final
NOTE that we store the User Group and value fields each time a new groupKey1 is encountered, HOWEVER, we only store the other field ONCE. This is because the other fields are actually associated with the Field Values.
For example, the field description might be "AD Can Open Something" and it will have "answers/values" for each user group.
These are the keys we will create on the final object.
- $local.final.fieldDesc_FINAL
- $local.final.screen_FINAL
- $local.final.fieldLabel_FINAL
- $local.final.attributeNum_FINAL
- $local.final.alias_FINAL
Post Aggregation
// Get the group keys you defined in your Calc aggregations Powerscript
groupKey1 = $record.groupKey1

// GROUP KEY 1
if (!$local[groupKey1].GroupSet) {
  // Create a persistant "final" key on the local object
  $local.final = { ...$local.final, [`${groupKey1} Group`]: [] }
  $local.final[`${groupKey1} Group`] = $local[groupKey1].value;
  if (!$local.fieldDescDone) {
    $local.final.fieldDesc_FINAL = $local[groupKey1].desc
    $local.final.screen_FINAL = $local[groupKey1].screen
    $local.final.screenOrder_FINAL = $local[groupKey1].screenOrder
    $local.final.fieldLabel_FINAL = $local[groupKey1].label
    $local.final.attributeNum_FINAL = $local[groupKey1].attributeNum
    $local.final.alias_FINAL = $local[groupKey1].alias

    $local.fieldDescDone = true
  }

  $local[groupKey1].GroupSet = true; //Setting to true means we will not excute this code again during the load.
} else {
  $omit()
}
Step 14 Flow Step FLUSH
#FLUSH Flow Step
Step 15 Flow Step Powerscript
In this last Powerscript, the code loops over the keys in the final object and assigns them to an actual Record. We just need to loop through and assign value in the keys to a $record name with the Key for each Key.
Final Processing
if (!$local.stopProcessing) {
    for (key of Object.keys($local.final)) {
      $record[`${key}_VIEWFINAL`] = $local.final[key]
    }
    $local.stopProcessing = true
} else {
    $omit()
}
Step 16 Flow Step Normalize
The last step is to normalize your single row, which is now just Arrays.
You will want to select all the field that end with VIEWFINAL.
Step 17 Choose Columns
The final step is to choose the columns to display. The easiest way to do this, is to click on the Columns and, the same way you chose the fields in the Normalize step, search for VIEWFINAL and choose those fields.
Informer Metadata Reports
The following reports are built using the Metadata datasource in Informer. This datasource may not exist in your Informer system yet. If you do not see an Informer Metadata datasource, enter a Salesforce case asking for it to be created for you.
Here is how to create the Informer Metadata datasource/database -> Informer Metadata Database Creation
Dependent Datasets
When building a report, you often need to join another dataset to retrieve additional information. These datasets serve as dependencies for the reports that use them.
It is crucial to track these dependencies to avoid deleting or making fundamental changes to them, as this could break the reports that rely on them.
To retrieve this information, you will need the following dataset and ad hoc report. The dataset serves as a dependency for the report.
This Dataset provides metadata for all ad hoc reports and datasets, including their names and IDs. This dataset should be set up in a Job to run every morning at 2am (or whatever time you choose).
[METADATA]-Report-Dataset-Index
This Ad Hoc Report will return all of the Reports/Datasets that have underlying dependencies.
Enhance with Links
There is a Powerscript after the Pull Joins / Set Type Powerscript called Create Hyperlinks. Make sure to update the Base URL to be your sites Informer URL.
baseURL = "https://YOURINFORMERbi.navigahub.com/"
if ($record['type'] === "Ad Hoc Report") {
    $record.LinkToReport = `<a target="_blank" href="${baseURL}reports/q/${$record['id']}">${baseURL}reports/q/${$record['id']}</a>`
} else {
    $record.LinkToReport = `<a target="_blank" href="${baseURL}datasets/${$record['id']}">${baseURL}datasets/${$record['id']}</a>`
}

$record.dependentDatasetLink = `<a target="_blank" href="${baseURL}datasets/${$record['joinedDatasetIds']}">${baseURL}datasets/${$record['joinedDatasetIds']}</a>`
Job Average Run Times
This report will show a list of jobs and their average run time based on their historical runs.
Job Details Report
This report will give you a list of your jobs and the datasets or reports used in them.
Job Status Check
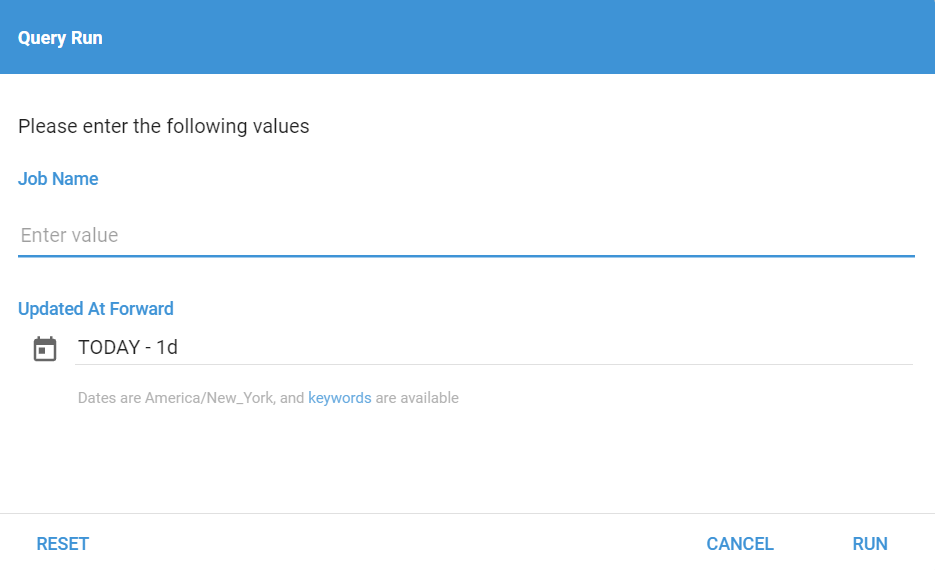
This report will return any jobs that have had an error in the past n days that you enter. You can also enter a Job Name to target a specific Job.
